How Enlighten is addressing ray tracing in video games
Silicon Studio details its global illumination approach, which integrated Enlighten with real-time ray tracing
If you've been paying attention to the launches of the new generation of game consoles, you've probably heard talk of ray tracing.
Ray tracing is a rendering technique for photorealistic graphics by simulating refraction and reflection of light. In other words, it makes light behave in video games like it would in real life. It simulates light rays and traces the path that a beam of light would take in the physical world. It looks very impressive, and with improvement in GPU, it's becoming a reality in modern games.
It has drawbacks, however. If developers only use ray tracing, then a large number of rays need to be projected to ensure high quality global illumination. Considering the fact that games require highly interactive environments, sufficient computation can be difficult even when using the latest, high-end GPU cards.
That's where we come in. We've been researching a way to render photorealistic imagery by using our Enlighten dynamic lighting technology and real time ray tracing to develop a hybrid method, which will allow for a better performance while maximising ray tracing effects.
This is still a project under development, and we anticipate the final results to be different, with improved performance and results all round.
Let's start with the demo we've created of a train yard. We built this in Unreal Engine 4 (although the technique can be applied to other engines), and the only light sources are from a single directional light and a single skylight.
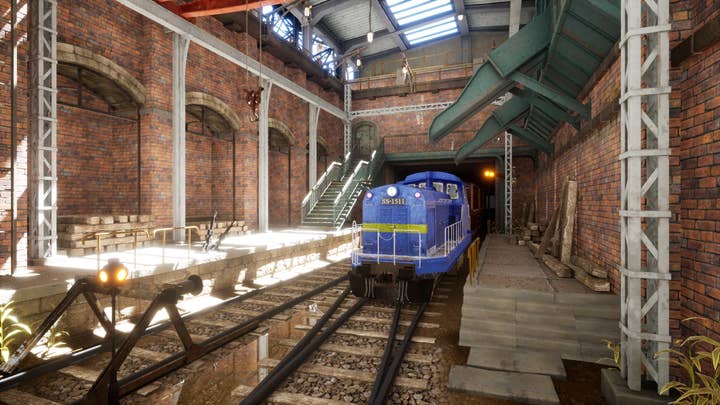
Ray tracing refletion with Enlighten
Our first topic is on ray tracing Reflection with Enlighten.
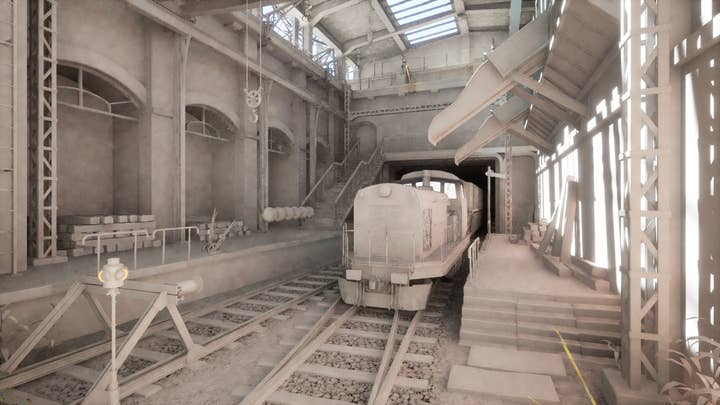
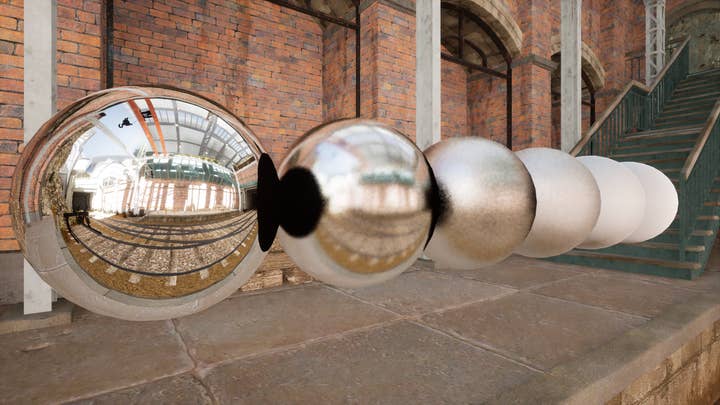
In terms of reflection, indirect lights are separate into two parts when rendered: Diffuse and Specular/Reflection. The diffuse part is view independent and has no relation to camera movement, so you will receive the same results when viewed from any angle. Specular/Reflection is view dependent, where the direction of reflection changes in accordance with the direction of the camera. This first topics focuses on specular/reflection.
The most common approach for reflection is the environment cubemap, which is called Reflection Capture in UE4.
Another approach is screen space reflection (SSR). This can bring beautiful results if its reflection is found within the image, although this is dependent on camera angles. If those reflections are found outside of the visible screen, artefacts are likely to occur.
And then there's ray tracing. Reflection rays are transmitted from surfaces, when a ray reaches an area, its material is calculated and the results are returned. It has no limitations like with SSR, and its reflection fills the entire scene, giving beautiful results.
In its current implementation, Enlighten adopts the environmental cubemap updated in real time approach. Where the angle of light changes, direct and indirect lights on the cubemap are updated in real time by the CPU. On the GPU side it is only necessary to sample the cubemaps generated by the CPU, the overall cost of Enlighten is small enough so performances are not impacted.
With ray tracing reflection, the entire scene is updated in real time, including off-screen objects. It creates high-precision results, but in the case of gloss reflections, multiple rays need to be transmitted, also in some case adding a second bounce might be required, all of which impacts the performance.
Our aim is to have the entire scene updated at real time, to have off-screen objects included in reflections, and generate high precision results thanks to ray tracing reflection, combined with Enlighten's indirect lighting to get more realistic results, and add a fall back to Enlighten where the performance hit would be too high for ray tracing only.
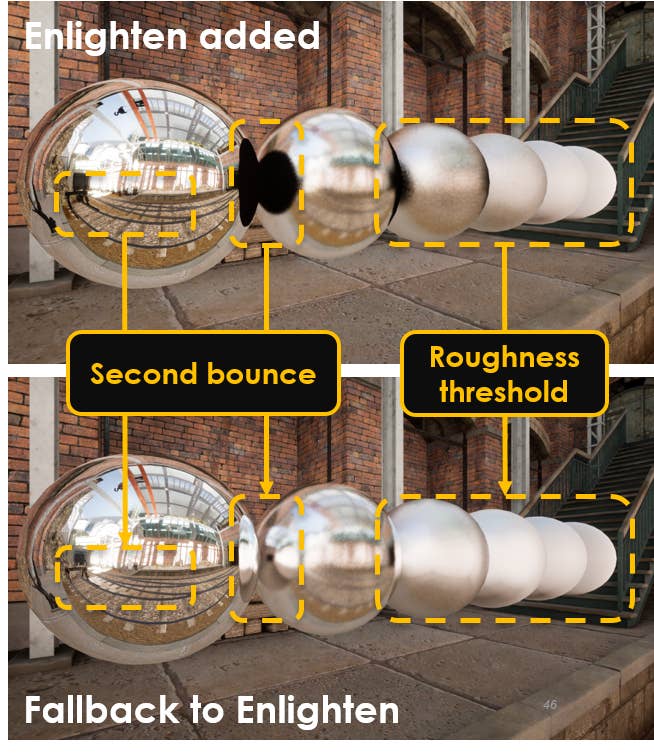
With the fallback feature, users can fall back to Enlighten's cubemaps if the roughness goes over a specific threshold, or if the number of bounces required impacts performance too much. Look at the screenshots, the upper one indicates the result after Enlighten was added. The lower one shows the result after the Fallback to Enlighten feature was introduced. The balls on the right went over the roughness threshold, so were replaced with Enlighten's cubemaps. The black parts between the balls indicate missing second bounces, so they are also replaced with Enlighten's cubemaps. This Fallback feature can mitigate noise generated by glossy reflections, and it means less rays have to be transmitted, which improves performance.
Now, let's look at the result. The ball in the center shows specular reflection. You can see how indirect lights are being updated.
In addition, look at the rail in the bottom right. Roughness values are changed so that the upper texture is smooth and the lower one is rough. The rough part falls back to Enlighten cubemaps. The ray tracing results and Enlighten cubemap results are seamlessly changing.
In terms of performance, we used the same scene to compare performance before and after Enlighten is added. Without Enlighten, ray tracking reflection is 1.72ms, but it only rises to 1.87ms after Enlighten is introduced, so the cost of adding Enlighten is fairly small. If you use the Fallback to Enlighten feature, performance is greatly improved as max roughness goes down.
Ray traced Enlighten visibility
At runtime, the game engine must provide to Enlighten not only the light source information but also the shadow information about that light source. This shadow information is called Enlighten visibility.
Having proper visibility data is required to prevent light leakage from the light source, thus allowing Enlighten to provide more accurate indirect lighting.
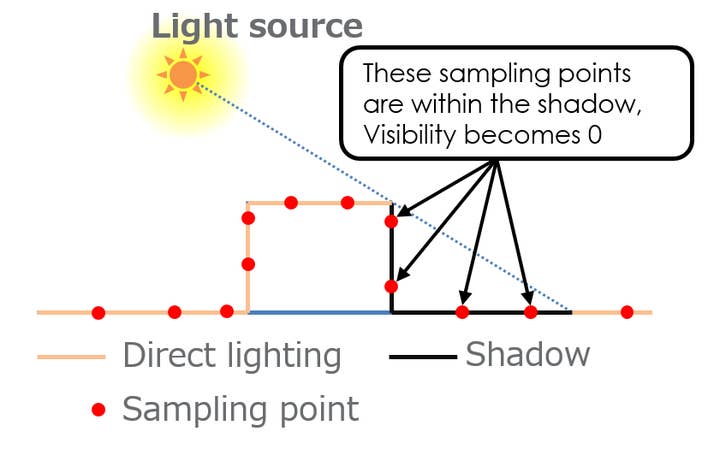
To gather these visibility data, Enlighten pre-defines in advance sampling points in the scene (see the diagram to the right). With the current implementation, sampling shadow map or ray casting are common ways to generate Enlighten visibility data. With hardware ray tracing ability, we are introducing ray traced enlighten visibility, a new method to generate these data.
For this method, we trace a ray from the sampling points to the light source, and if it intersects an object in between it sets visibility value to zero. That means that even if the light source position changes, or if a moving object interferes with the scene, the visibility updates in real time. This method has the advantage to support all types of light source, and can be simply adapted to all game engines that support ray tracing.
On the video above, you can notice the indirect lighting getting darker in real-time with the roof window closing, and if you focus on the tunnel, as the amount of direct light decreases, less indirect lighting reaches the inside of the tunnel making it darker.
Performance-wise, the type of transmitted rays is now limited to shadow rays only. The number of rays is decided by the number of movable lights, and the number of sampling points affected by each light. In the demo we showed, only a single directional light is placed that affects the entire scene. This created 40,000 sampling points, which means you have 40,000 shadow rays, and using a GeForce RTX 2060, it took 0.04ms to process.
Ray tracing Final Gather with Enlighten
After specular/reflection in the first topic, it is now worth us explaining how Diffuse indirect lighting is calculated. In this diagram you have a spotlight and a gray box. The spotlight lights part of the ceiling, this is the direct light. The areas where the question marks are remain black, however, they are supposed to be lit by indirect light, which is where Enlighten comes in.
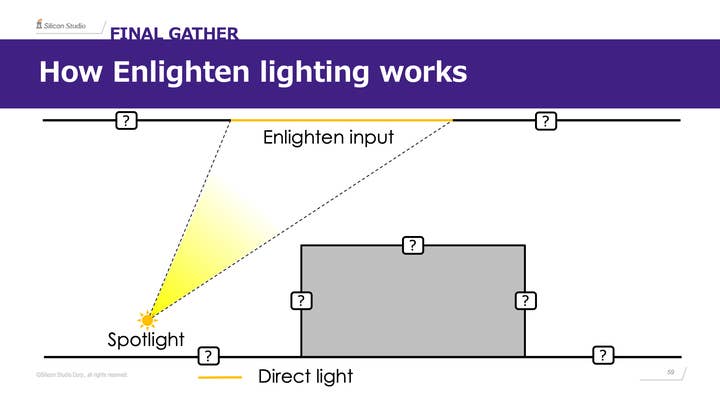
During the initial precompute phase, Enlighten generates optimized runtime data about static actors (actors with a fixed shape and position). At runtime Enlighten takes these data as input, along with the direct lighting and material information provided by the engine to generate indirect illumination from endless light bounces.
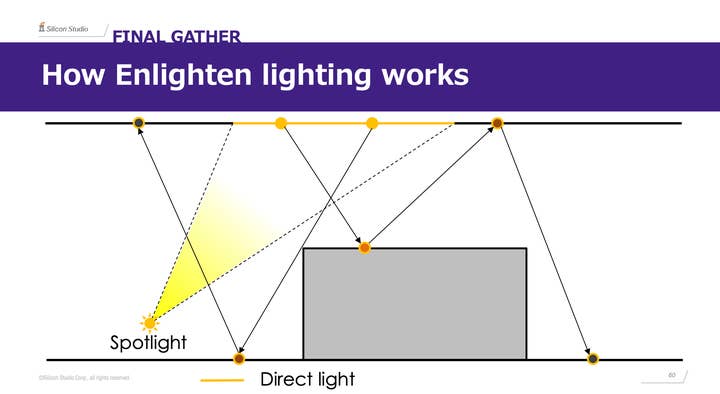
This is the result:
In this section, we are talking specifically about Diffuse lighting, so that's the result of lighting only. Here is us rendering just the lighting part:
With Enlighten, the indirect lights from the directional light and skylight are updated in real time. However, with the blue train being a moving object, precompute data does not take it into account so the light bounced from the train is not rendered.
Now onto Final Gather lighting feature. Final Gather transmits rays from a rendering point and summarizes lighting information of the place where they hit. As it only simulates the first light bounce, it is often used in conjunction with another global illumination.
In UE4's Final Gather implementation, rays are transmitted from pixels on the screen. When the rays from these pixels reach an area, that triggers a gather point. Then the shadow ray is transmitted to the light source from the Gather Point. The process is usually called 'next event estimation' in path tracing. Rather than transmitting rays randomly, it transmits directly on the light source, which can result in a faster convergence.
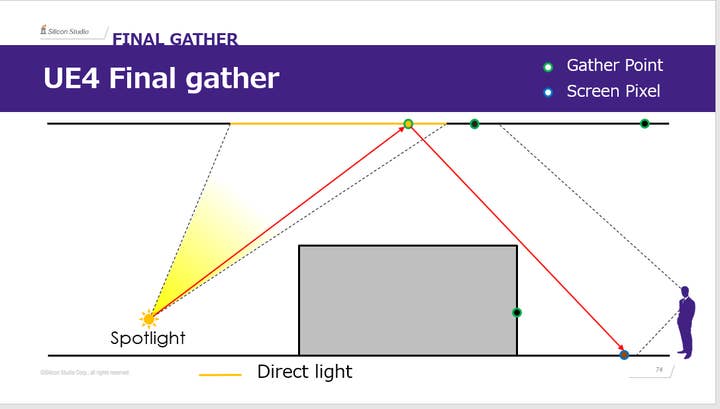
You then obtain lighting by Gather Points and summarize them to Screen Pixels. You can then obtain indirect light results of the Screen Pixel. You can see the result below, where the light bounces from a moving object.
So, let's compare Enlighten's lighting with UE4's Final Gather. Enlighten has infinite bounce, stable lighting results and the GPU load is not heavy. However, details are limited based on light map pixel size, and there is no bounce on moving objects. With UE4's Final Gather, you get a beautiful first bounce, and it bounces of moving objects. However, it is first bounce only and is noisy.
As you can probably tell by these advantages and limitations, the two approaches complement each other. By combining both, you can get Enlighten's infinite bounce alongside Final Gather's beautiful first bounces, plus light can bounce of moving objects.
To do this there are two approaches. You either add Enlighten's results at Screen Pixel or at the Gather Point. For ease, we decided to focus on the results at Gather Point. This means Enlighten results are bounced one more time, and you can get second bounces from movable objects. You will get more bright lighting results from the Gather Point, so you can expect less noise.
As you can see from the results, the entire scene becomes brighter due to Enlighten's endless bounce. Now look at the areas circled below.
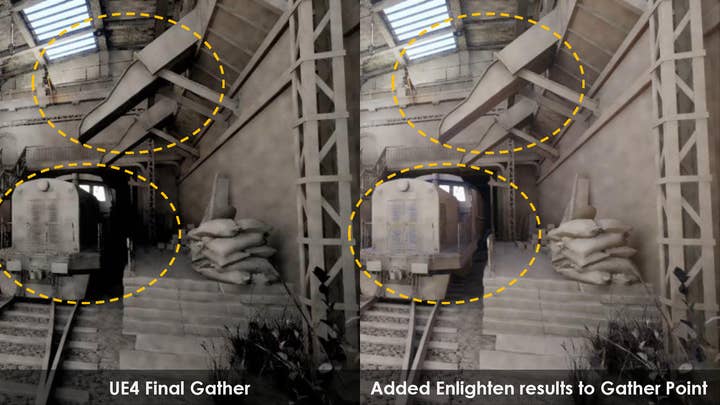
Compared with the Unreal Engine 4 Final Gather result, the second bounce and following bounces have been added. The red bricks on the right are bounced and redness was applied to the right side and upper side of the train. You can also see bounces from the train, which is the moving object.
Now look at the comparison screenshots below:
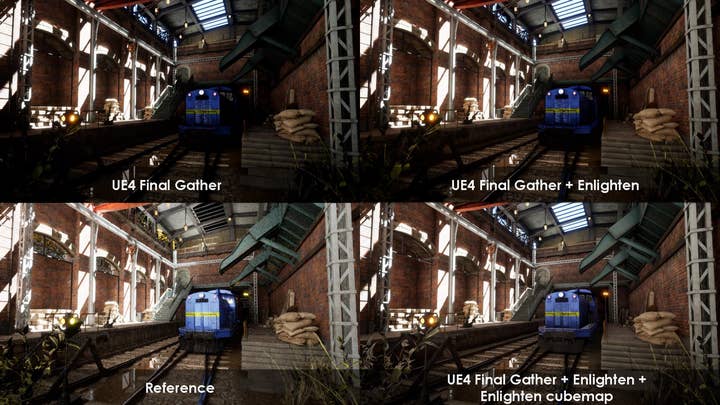
The lower left shows the Path Tracing result as a reference, and if you compare it to the Unreal Engine 4 Final Gather result, and add Enlighten's Reflection, the result is very close to the Path Tracing ones. Compared with the Final Gather result, you have less noise, but you do still have some.
In terms of performance, with Final Gather alone, we see a 3.06ms for the Create Gather Points path, whereas with Enlighten that rises to 3.58ms, so the costs are, once again, relatively insignificant.
This is all still a work-in-progress and we plan to reveal more in due course. Starting with Enlighten 3.12 release, support for ray-traced Enlighten visibility and combination of ray tracing reflection and enlighten will be offered in early access. Combination of ray tracing final gather with Enlighten will be offered as Experimental.
For more details about Enlighten, click here. You can also check out recent Enlighten tutorial videos on YouTube here.


